Knitted Warmth: Tweed Stitch Blanket

IMG_8386-Blanket - Copy

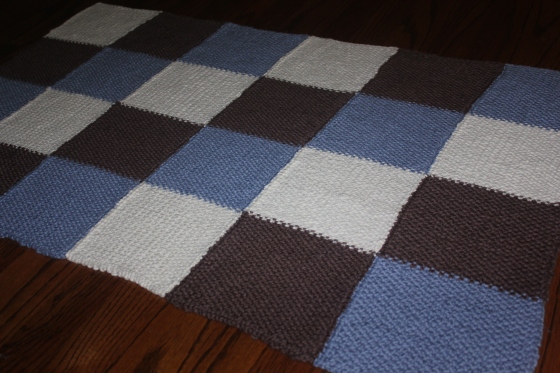
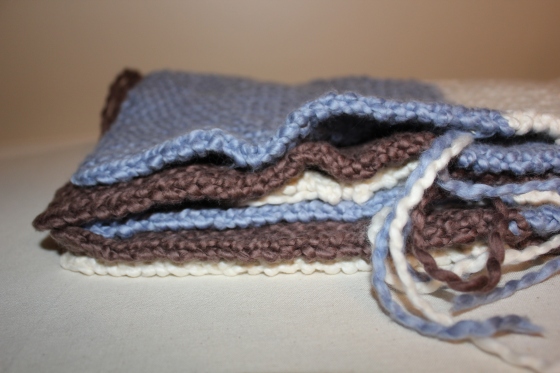
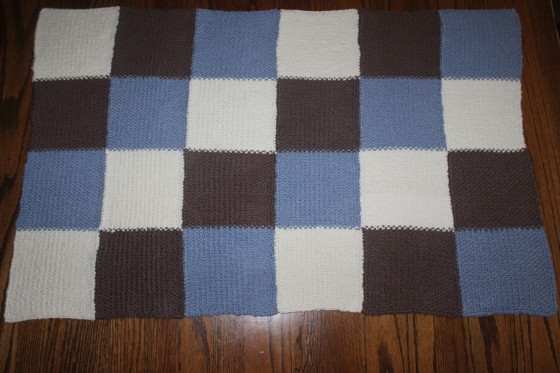
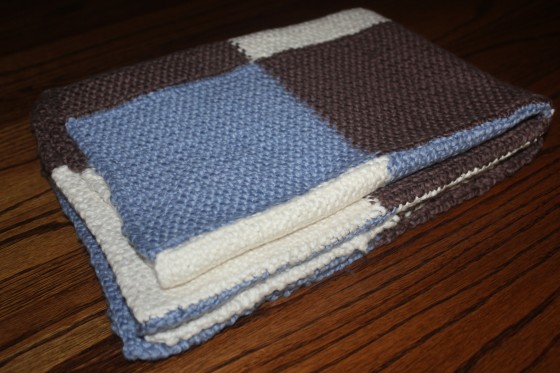
With summer drawing to a close and the school year almost upon us, I have been spending the last couple weeks trying to finish up projects. One of the first projects on my list was this baby blanket. I started it at least five years ago, knitted the panels, and then let them sit in my closet for several years. I finally picked it up last weekend and was able to stitch them all together.

IMG_8633-Six panels

I remember wanting a project to work on and after looking through Leann Prouses’s book, Knitting at Home, I fell in love with the simple yet pretty design. I picked up enough yarn for the blanket at JoAnns, making several trips to ensure I got a coupon on each ball, and knitted it on trips or while listening to a history read-a-loud. It took a while, but it was fun to knit. I really liked the stitch which was used, Tweed Stitch, and enjoyed the effect that occurred when changing colors.

IMG_8391-Tweed Stitch 2

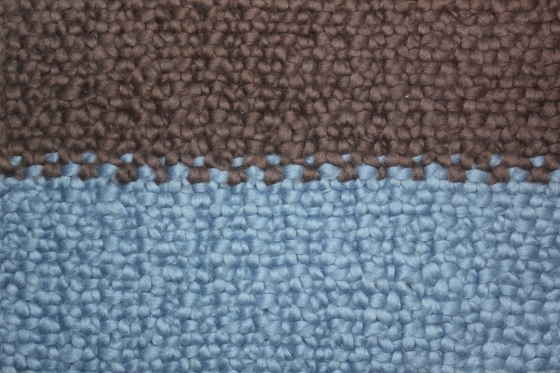
I used US size 9 needles instead of the size 7 recommended (I think this was one of the few projects in which I actually checked my gauge before starting). The blanket was knit in six panels, each panel having four squares. There were three colors and they were alternated to achieve a checkered effect. I sewed the panels together using edge to edge stitch and some Coats & Clarks Dual Duty XP thread. The pattern has an embroidered design, with blanket stitch around each square and a lazy daisy in the middle, however since this is supposed to be for a boy, I decided not to do the embroidery. I might add the last name initial on one of the squares after I decide who to gift it to.

IMG_8384-Checkerboard - Copy

Having sewn the panels together with them draped over my lap, I can testify to the fact that this blanket is warm. Now, I wait for the day when some little one will enjoy it’s warmth too.

IMG_8403-Ready - Copy

Pattern: Tweed Stitch Blanket from Knitting at Home by Leanne Prouse

Yarn: Nature’s Choice Organic Cotton Yarn (Discontinued) (Almond, Walnut, and Dusty Blue)

Staying Sharp: Sewing Pencil Pouches

Pencil Pouches Collage 2

My summer started out like any other, with lots of great plans for finishing projects and starting and finishing new ones. But then, reality set in. So here I am almost ready to start school again, and only one finished project to show for it. But don’t worry, I’ve got one other project close to being done, so hopefully, you’ll see some more completed projects before the summer is out.

This project, sewing seven pencil pouches, was begun after seeing these adorable pouches on Pinterest along with the well-written tutorial from Qwenny Penny. I wasn’t looking to sew some pencil pouches, but they were irresistible.

I originally planned on making one for me and several for Christmas gifts for last year. Needless to say, I didn’t get them done in time for Christmas. So, now that they’re done, I’m saving them for THIS Christmas.

Here’s a timeline of the process it took for me to get these pouches completed along with some notes on how I did it.

Collage  1.jpg

November 28, 2015: Fabric is purchased! I bought all my fabric in the form of fat quarters when they were on sale at JoAnns. I purchased each of the solid colors needed, as well as two different patterned grays to use for the lining. I also bought my zippers at JoAnns; I used Coats & Clarks All Purpose 9″ Zipper in color Nugrey. I only paid $0.75 for each fat quarter plus tax, plus I was able to get the zippers at least 40% off using a coupon. I determined that it costs $2.50 for the materials for one zipper case (taking into account you only need a fraction of a fat quarter for the fabric for each case). Not bad for a little project!

March 13, 2016: I finally got everything together, washed my fabric, cut it, and started sewing. I originally just sewed one case to make sure I liked it and work out any kinks I might run into.

Pouch #1 Version 2 Edited

March 14, 2016: I didn’t have any problems and didn’t do anything different from what the tutorial said too. Pencil pouch #1 was a success! I then started cutting out fabric to make six more and began assembling them assembly-line style.

IMG_3734-Edited

July 9, 2016: The big batch of six pouches is finished!

Though it took ME forever to finish all seven that I made, the pouches don’t take long to sew and were super easy to make using the tutorial from Qwenny Penny. So now it’s your turn, keep your pencils sharpened and make yourself a sharp-lookin’ pouch to hold them in. Let me know how yours turns out!

Stitchin’ British: Cross Stitch Coasters

IMG_2496-Blog Post Main Photo-1
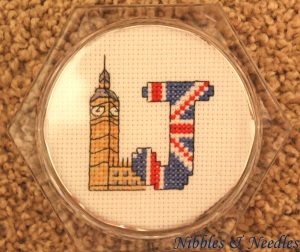
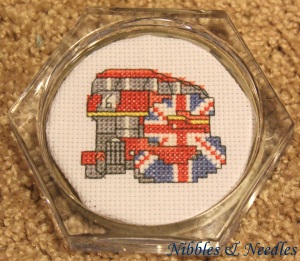
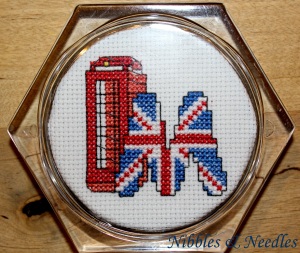
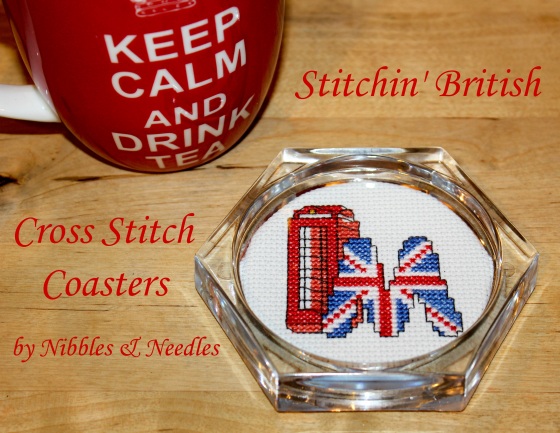
Though I may have neglected this blog, I have not neglected crafting and one of the things I was able to make for Christmas last month were cross stitch coasters.

Pinterest can be very dangerous (time-waster!) but it can also yield some neat things such as a cross stitch pattern for a British Alphabet that my sister found. The alphabet uses a variety of different designs for the letters. The designs are the perfect size for coasters so I used them to make coasters for my aunts and grandma.

IMG_2258-Close Up-1

The patterns (A-H, I-Q, R-Z) that we found were actually scans from a cross stitch magazine and only an image was available from the Pinterest link. This made it a little bit difficult to distinguish the difference between some of the cross stitch colors so I ended up just choosing what I thought looked best in some areas.

IMG_2265-Close Up-1

I purchased individual coasters from JoAnns which include a small square of cross stitch fabric. I copied the design onto some cross stitch graph paper using colored pencils and found this much easier to follow than the original pattern.
IMG_2485-Close Up-1

All-in-all they were super easy to make and are great gifts.

Cheerio!

A Card for All Occasions: 2-In-1 Butterfly Cut-Out Cards Tutorial

2-In-1 Butterfly Cut-Out Cards-These extremely easy cards are perfect for any occasion. Get the free tutorial from Nibbles & Needles

I enjoy sending handmade cards, whether it be for a birthday, thank you, or just because. Recently I had several notes to write so I thought I’d try and make some cards. I browsed Pinterest for inspiration and happened across this pin. The link led to a private blog so I searched for a butterfly template and came with a couple different variations.

A Finished 2-In-1 Butterfly Cut-Out Card using the free tutorial from Nibbles & Needles

I called this card the 2-In-1 Butterfly Cut-Out Card because once you cut out one butterfly you have enough pieces for two different cards. It can be used for whatever occasion you like, just change the message. Perfect for birthdays, thank yous, or even just a note.

Everything you need to make some 2-In-1 Butterfly Cut-Out Cards

You Will Need:

  • Butterfly Template Printed on Card-stock at Regular Size (I used this one from Babytalk Bungalow.)
  • Butterfly Template Printed on Card-stock at Smaller Size (I copied the original template and set my printer to reduce it to 25%, you may have to play with your printer or computer settings to get the right size)
  • Blank White Cards and Envelopes
  • Colored or Patterned Paper
  • White Card-stock
  • Paper Cutter
  • Scissors
  • Double-Stick Tape or Glue
  • Pencil

How To Make It:

  1. Cut out the large butterfly template(s), you can choose whichever one you like best or cut out all four and try them out to see which one you like best (I used the one on the lower left of the PDF because it fit my card size best).Butterfly Templates for the 2-In-1 Butterfly Cut-Out Card from Nibbles & Needles
  2. Cut out a piece of the colored/patterned paper that is the same size as the front of your card (My cards were 5.5″ x 4″, so out of one piece of my construction paper I was able to get 4 pieces the size of my card along with two 1″ strips which come in handy later for the message).Paper Cut Out and Ready for Making the 2-In-1 Butterfly Cut-Out Card by Nibbles & Needles
  3. Fold this in half and trace half the large butterfly on one side. You don’t want to trace the middle of the butterfly so line it up like in the photo below. Now cut this out. You’ll now have two different pieces.Cutting Out Butterflies for the 2-In-1 Butterfly Cut-Out Card from Nibbles & Needles
  4. For Version 1: Tape/glue each piece centered to the front of a blank card. Cut a 2″ x 1/2″ strip out of both your colored/patterned paper and out of white cardstock. Write your message on the paper and glue/tape it centered on the card as show below.Two of the 2-In-1 Butterfly Cut-Out Card from Nibbles & Needles are now completed
  5. For Version 2: Cut 1/4″ off each side of the stencil piece and then cut it in half. Cut the butterfly in half also. Now arrange them on the card as shown below (make sure that the sides that face up don’t have pencil marks on them, if so flip them over and reverse them) and tape/glue them down. (The reason that you arrange one card one way and the other reversed is because if you were to have them both face the same way one of your pieces would most likely have pencil marks showing.) Write your message in the corner as shown below.Two of the 2-In-1 Butterfly Cut-Out Cards Completed using the Tutorial from Nibbles & Needles
  6. Cut out the small butterfly template that is the same as the large butterfly you used for the cards.Comparison between the Large and Small Butterfly Templates used for the 2-In-1 Butterfly Cut-Out Card from Nibbles & Needles
  7. Cut out a 1.5″ x 1.25″ piece of the colored/ patterned paper. Following the directions in step 3, trace and cut out a butterfly. Glue/Tape the butterfly wherever you want on the envelope (I chose to put it on the front in the lower left-hand corner).Dressing up the envelope 2-In-1 Butterfly Cut-Out Card from Nibbles & Needles
  8. Repeat step 7 for however many cards you are making so that each has a nice envelope to go with it. Now you’re done!Envelopes for the 2-In-1 Butterfly Cut-Out Card from Nibbles & Needles

These cards are super easy, don’t take a lot of time, and are perfect to use for any occasion. So now that I’ve shown you how, it’s your turn to make a few.

Happy crafting!

~The Paper Cutter (who also frequently nibbles and wields a needle)

2-In-1 Butterfly Cut-Out Cards-These extremely easy cards are perfect for any occasion. Get the free tutorial from Nibbles & Needles

Celebrate Mothers: Hearts & Flowers Mother’s Day Card Tutorial

Hearts & Flowers Mother's Day Card-This quick and easy tutorial from Nibbles & Needles shows you how to use your scraps of leftover paper to transform a blank white card to a card perfect for celebrating your mother

Whenever I have a note to write I usually make a card. Mother’s Day was no different. I browsed Pinterest searching for Mother’s Day cards. I came across this card from Creative Cake-Tea and decided to make my own. Since the blogger didn’t give many specifics I figured I could share how I did it with you in case you want to make this card as well. Now I know that I’m late on posting this. I left making the card to the last minute (Saturday night) so this blog post was not near ready in time. However you could use this card for any occasion by changing the message on the tag or you  can also file the idea away for next year. Either way hopefully this is helpful for those of you who (like me) try and write every note on a handmade card.All the Materials Needed to make a Heart 'n Flower Bouquet Card What You’ll Need:

  • Blank White Card and Envelope-Mine was 4″ x 5.5″ (you’ll need to adjust the size of everything so it still looks proportional if you use a significantly larger card)
  • White Card-stock or White Textured Paper (I used a textured white paper that I had in my scraps instead of white card-stock)
  • Scraps of Assorted Colored Paper (You’ll need green, whatever colors you want to use for your flowers, and whatever color you want to use for the tag.)
  • 2 .5″ piece of ribbon (I used a 1/4″ sheer ivory ribbon.)
  • Heart Punch-Mine was 1/2″ from point to point
  • Paper Cutter
  • Scissors
  • 1- Hole Punch Tool
  • Double-Stick Tape or Glue
  • Pencil
  • Colored Pencil (for writing “Happy Mother’s Day” on the tag)
  • Ruler

How to Make It:

  1. Make your tag. Cut out a 2″ x 1.25″ piece of colored paper. On the wrong side of the paper use your pencil and ruler to mark 3/8″ from each edge on one end just as shown in the picture below. Now cut diagonally from point to point. Using your 1-hole punch, punch a hole in the tag like shown below. Out of the white card-stock or textured paper cut a 1 3/8″ x 1 1/8″ piece of paper. Write “Happy Mother’s Day” on it using your colored pencil. Tape/Glue this to the colored tag. Thread your ribbon through the hole in the tag and tie a knot (a single knot works, just pull it tight). Make sure that the ribbon ends are relatively even on both sides.Construct the Tag to Add to the Heart 'n Flower Bouquet Card
  2. Make the Flowers. Punch four hearts for each of the three flowers out of your colored paper. Use however many different colors as you want. I made each of my three flowers out of the same color. However, for one I used three different shades, for the second I used two different shades, and for the third I made it all out of one shade. Just choose your colors and whether or not to do different shades based on what you like and what you have on hand. It looks good either way.Punched Out Hearts Ready for making the Hearts & Flowers Mother's Day Card
  3. Now you will need to arrange the petals (hearts) into flowers. The easiest way I found was to first put a small piece of tape on the back of one of the petals. Flip it over and then add one petal at a time and overlap the one before it, pressing it against the tape so it sticks. Once you get to the last one you want to position it so it is overlapping the one before it but is also under the first one so that the first overlaps it. Make sure that you firmly press the petals to the tape so they stay put. Now set the flower aside (make sure it’s upside down since the tape will still be on it). Do this for each set of four petals so that you end up with three flowers.Flower Construction Collage-1Flowers for the Heart 'n Flower Bouquet Card
  4. Cut your stems. Take your green piece of paper (it will make it easier if it’s almost as big as the front of your card) and lay it on the front of your card with the flowers arranged where you want them (make sure the side with the tape is facing up so they don’t stick to the card) as I did below. Now trace approximately where you want the stems (make sure you make the tracings wider than you want your stems to be so that when you cut you don’t end up with pencil marks). Cut your stems out. I did end up having to erase some of my marks because otherwise they would have shown when I cut out the stems. As long as you have a good eraser though, it’s not a big deal.Making the Stems for the Heart 'n Flower Bouquet Card
  5. Assemble the Card. Using tape/glue attach the stems to your card. Attach your flowers to the stems on the card (your assembled flowers should already have tape on the back that’s holding them together so just use this to adhere them to the card). Using tape/glue attach the tag to your card.Fully Assembled Heart 'n Flower Bouquet Card
  6. Make a small flower to embellish the envelope. Cut a 1″ green stem. Cut out another four hearts and form a flower just like you did in step 3. Tape/glue the stem to the lower left hand corner of the envelope and then attach the flower.Embelished Envelope for the Heart 'n Flower Bouquet Card
  7. You’re done! Now add a sweet note saying how amazing your mom is (because if she’s anything like my mom, she’s amazing), because a pretty card means nothing without a sweet message!

Hopefully this is helpful. Feel free to ask me a question below if I wasn’t clear on anything.

Happy crafting!

~The Nibbler and Needle-Wielder and Paper Cutter (since this project didn’t involve any needles or nibbles)

Chocolate Chip Cookies

Chocolate Chip Cookies-Easy and Delicious Recipe from Nibbles & Needles

For the first post on this blog I thought it appropriate to share a post directly related to the blog name and actually my blog’s header image. So if you’re gazing at the header image thinking, “I want those cookies,” here’s the recipe for you.

Yesterday some really good family friends stopped by for a short visit. One of my younger brother’s first reaction to hearing when they would be arriving was: “We need to make cookies.” Which he did, specifically he made a double batch of the classic chocolate chip cookies.

This recipe, from Betty Crocker’s Old Fashioned Cookbook, has become one of our favorites and we make them relatively frequently. They’re super easy, pretty quick to make, and taste delicious.

So go make a batch, or two!

Chocolate Chip Cookies

Ingredients:

  • 1 cup Butter, softened
  • ¾ cup sugar
  • ¾ cup brown sugar
  • 1 egg
  • 2 ¼ cups all-purpose flour
  • 1 teaspoon baking soda
  • ½ teaspoon salt
  • 2 cups (12 oz.) chocolate chips

Directions:

Heat oven to 375°. Cream butter and sugars. Add in egg. Stir flour, baking soda, and salt in small bowl. Add dry ingredients to wet mixture. Stir in chocolate chips. Bake on ungreased pan for 8-10 minutes or until lightly brown.

Makes 6 Dozen.

Click to download the recipeChocolate Chip Cookies from Nibbles and Needles.

Enjoy!

~The Nibbler and Needle-Wielder